Layer Configuration
Note: The geometry type of a vector feature must match the target layer. Point features can only be saved to point layers, line features to line layers, and polygon features to polygon layers.
Layer Configuration provides the following functions:
- Switch the active layer;
- Add, modify, and delete custom layers;
- Configure layer colors, line styles, line widths, and fill styles;
- Add, modify, and delete layer attribute fields;
- Configure enumerated field values and their meanings;
- Save or export the current layer configuration.
You can also switch the active layer by clicking a vector layer node in the Project tree.
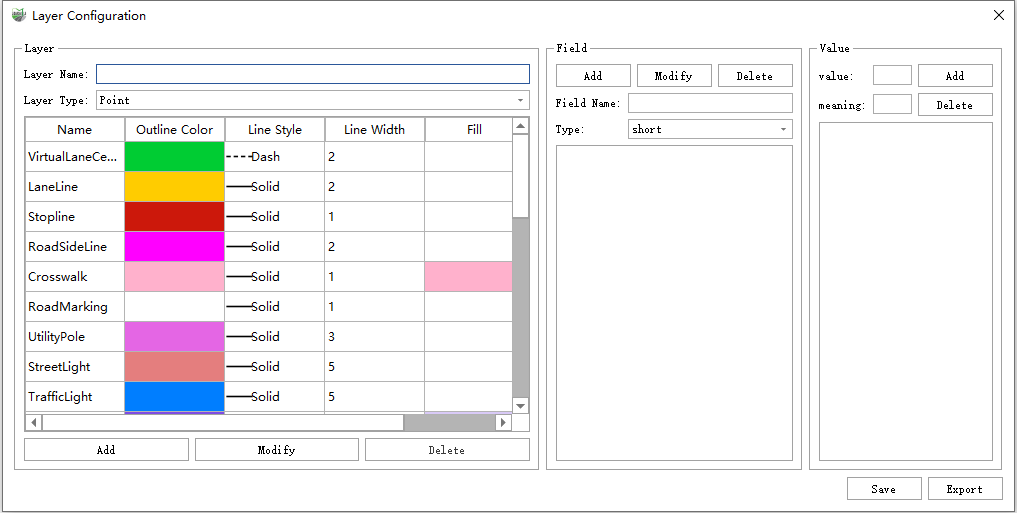
Layer Configuration Dialog
Interface Description
The Layer Configuration dialog contains three configuration areas: Layer, Field, and Value.
- Layer: Configure layer names, geometry types, and display styles, and add, modify, or delete custom layers.
- Field: Configure attribute fields for the selected layer, including the field name and field type.
- Value: Configure enumerated values and their meanings for the selected field.
- Save: Save the current layer configuration.
- Export: Export the current layer configuration for subsequent import or project-template creation.
Layer Configuration
Select a Layer: Click a target layer in the layer list. After selecting it, you can configure its style, fields, and field values.
Switch the Active Layer: Select a layer from the Layer Name drop-down list in the lower-left corner of the main interface, or click the corresponding vector layer node in the Project tree.
Add a Layer:
- Enter a name in the Layer Name box;
- Select Point, Line, Polygon, or Annotation from the Layer Type drop-down list;
- Configure the outline color, line style, line width, and fill style as needed;
- Click Add. The new layer is added under the custom-layer node in the Project tree.
Modify a Layer: Select a layer, change its name or style, and click Modify. You can also double-click a color, line style, line width, or fill cell in the list to configure it.
Delete a Layer: Select a custom layer and click Delete.
Note:
- Built-in layers cannot be deleted, and their geometry types cannot be modified.
- Only polygon layers support fill styles.
- Use a combination of letters and numbers for layer names and avoid special characters.
Field Configuration
After selecting a target layer in the layer list, configure its attribute fields in the Field area.
- Add: Enter the Field Name, select the field Type, and click Add.
- Modify: Select a field in the field list, change its name or type, and click Modify.
- Delete: Select a field in the field list and click Delete.
Supported field types include Short Integer, Long Integer, Float, Double, Text, Date, and Binary.
Note:
- Built-in fields cannot be modified or deleted, but new fields can be added to built-in layers.
- Text fields require a length. For floating-point fields, the width can be configured to control the number of decimal places displayed in the Attribute Table.
Field Value Configuration
After selecting a layer and field, configure enumerated field values in the Value area.
- Value: Enter the field value to be stored.
- Meaning: Enter the display meaning associated with the field value.
- Add: Enter the value and meaning, and then click Add.
- Delete: Select an entry in the value list and click Delete.
After enumerated values are configured, users can select field attributes by their meanings in the Attribute Table or Feature Property panel. For integer fields, the system stores the numeric value associated with the selected meaning in the database.
Note: The Add button in the Value area is unavailable when no field is selected in the Field area.