Classify by Manual Editing
Class Settings
Function Description: This function is mainly to determine the source category and the target category.
Steps
1.Click Class Settings![]() button, pop up the Class Settings dialog box.
button, pop up the Class Settings dialog box.
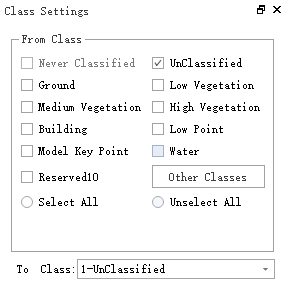
Parameter description:
- From Class: Source class(es).
- To Class: Target class.
Classify Selection
Function description : Select the area through the box selection, you can classify the selected area.
1.Click Classify Selection![]() button, pop up the Edit dialog box.
button, pop up the Edit dialog box.

Parameter description:
 Polygon: Select a polygon area.
 Rectangle: Select a rectangular area.
 Spherical: Select a spherical area.
 circle: Select a circle area.
 Online: Select an online area.
 offline: Select an offline area.
 Plane: Select a plane area.
 On the surface: By clicking on at least three points to select objects above the plane, this tool can effectively select moving objects above the ground.
 Under the plane: Select objects under the plane by selecting at least three plane points; it can select moving objects on the ground/road.
 Plane distance setting: Set the selected area on the plane.
- Click Plane Distance Settings to pop up the Plane Distance Settings dialog box.
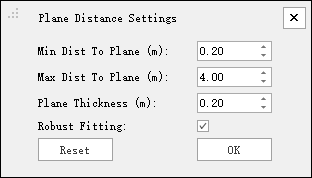
- Min Dist To Plane (m): Set the minimum distance to the plane.
- Max Dist To Plane (m): Set the maximum distance to the plane.
- Plane Thickness (m): Set the plane thickness.
- Robust Fitting: the effect is better and the speed is slower.
- Reset: Click this button to restore the default values of all parameters.
- Click Plane Distance Settings to pop up the Plane Distance Settings dialog box.
 Unselect: Reverse the selection in the area.
 cancel: Deselect.
 Save: Save the selected point cloud area.
 exit: Exit editing mode.