New Project
Steps
After starting the software, click the New Project ![]() button to access the New Project Wizard to configure original data page:
button to access the New Project Wizard to configure original data page:

Before starting to process the data, it's recommended to gather all collected data into a fixed directory on the local disk of the computer. The directory name should be in English or in numerical characters, such as "LiDARData". The New Project Wizard mainly includes adding point cloud data, trajectory data (optional), panoramic/flat image data (optional), and setting the project file path.
Scanning System
Scanning systems supported: General, Trimble, Leica, Orbit, Riegl, LIDARUSA, Navis. Once the scanning system is set, the file format filter will be applied according to the scanning system set when selecting the camera file path.
Set Point Cloud File Path
The software supports *.LiData, *.las, *.laz, *.e57 point cloud files.
- Add: Add point cloud data files, multiple selections are supported
- Delete: Deletes the point cloud file path selected on the left
- Clear: Clears all point cloud file paths
Set Trajectory File Path
The software supports *.traj, *.pos, *.txt, *.csv, *.asc, *.xyz, *.pts, *.out trajectory files
- Trajectory File: You can directly edit the box to input the trajectory path, or use the browse button on the right to choose the trajectory file.
- Trajectory Format Selection: You can choose to convert the trajectory format, including:
- None: No format conversion.
- Original System and Target System: Select the time format of the input trajectory file and the output time format, and choose the measurement date for conversion.
- Multiplication and Addition Constants: Use a formula to linearly transform the time, output time = a * input time + b.
- Heading Angle Adjustment: Perform meridian convergence angle conversion on the trajectory.
- Coordinate System: If the point cloud data file has coordinate system information, the coordinate system information of the point cloud data file will be filled in. Users can also set the coordinate system themselves.
- Conversion Options: Conversion options for the trajectory coordinate system, you can choose whether to use the seven parameters.
Set Camera File Path
- Image Information: Support for panoramic images and flat images.
Panoramic Image
- Camera File: Input panoramic image file
The software supports *.imglist, Leica Pegasus File *.csv, Trimble MX9 File *.csv, Riegl MMS File *.csv, LIDARUSA SNOOPY File *.txt, OrbitPos *.txt *.csv files.
Flat Image
- Camera File: Input flat image file, supports suffix *.imglist, Leica Pegasus File *.csv, Trimble MX9 File *.csv, Riegl MMS File *.csv, LIDARUSA SNOOPY File *.txt, OrbitPos *.txt *.csv files.
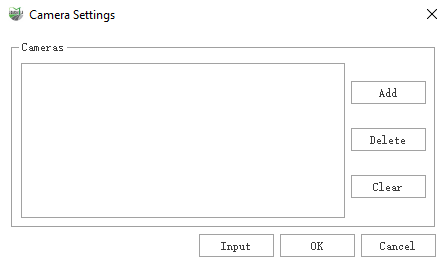
- Camera Parameters: You can choose our company's cal calibration file as the parameter import, or you can click the add button in the camera parameters to manually add the calibration parameters of the flat camera, you need to fill in the camera ID, the internal parameters of the camera, the axis angle of the installation structure, and calibration parameters
- Camera ID: When the device has multiple cameras, the camera ID is cumulative, corresponding to the CameraName field in the .imglist file
- Camera Internal Parameters: f is the focal length; cx, cy are the offsets of the optical axis to the coordinate center of the projection plane; k1, k2, k3 are the coefficients of the Taylor series expansion, used to correct the radial distortion caused by the lens; p1, p2 are used to correct the tangential distortion caused by the lens; b1 and b2 are generally not required to be filled in.
- Installation Structure (Axis): The degree value of the camera rotating around the z, x, and y-axis to the coordinate system where the IMU is located.
- Calibration: X, Y, and Z are the boom values of the camera, and roll, pitch, and heading are the camera installation angles.
Steps
1.Select the flat image, and add the image file.
2.Click settings, and the Camera Settings dialog box pops up.
3.You can click the "Import" button to directly import the cal calibration file or the saved .ini file, or manually add the calibration parameters of the flat camera.
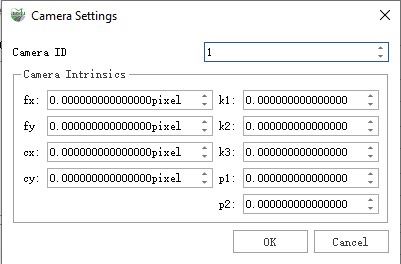
Manually add the calibration parameters of the flat camera
4.Click the OK button after the setting is completed.
Set Project File Path
- Location: Set the folder where the project file is stored, which will be in the same level directory as the point cloud by default, and the path can also be changed.
- Name: Set the name of the project file (suffix .LiMMP), named by the current time by default.
Drag and Drop Point Cloud
Feature Description: Complete the creation or modification of the project, by dragging and dropping several point cloud files onto the main window of the software and releasing the left mouse button, the relevant operation can be completed.
1.If the current project is empty, the software automatically creates a new project file—named with the current date—under the directory of the first successfully loaded point cloud.
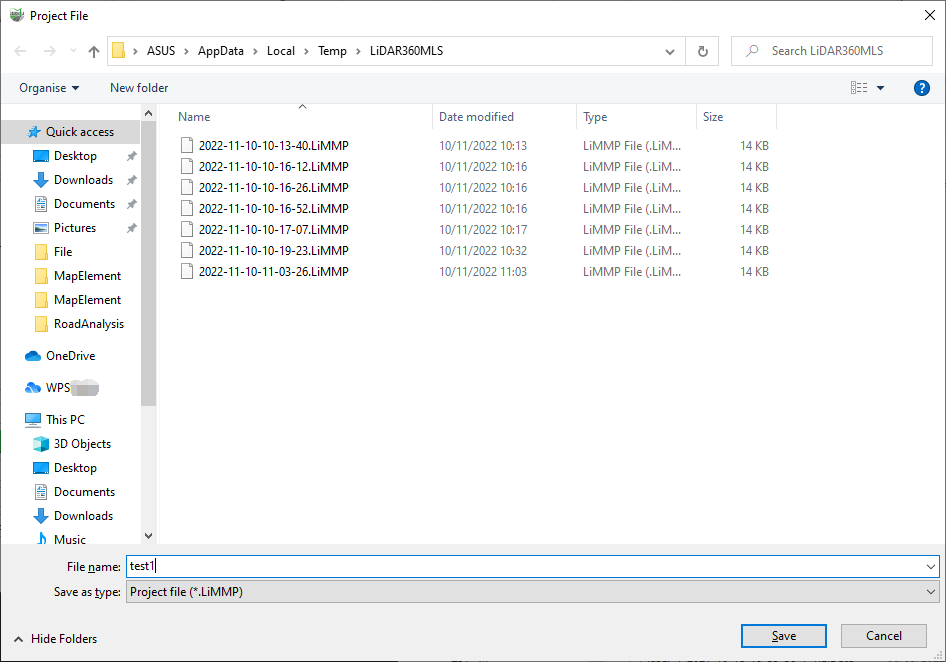
Project File
2.If the current project is not empty, the point cloud will be automatically imported into the project. Point clouds that fail to pass the project’s coordinate consistency check will be automatically excluded.
Note: After the cut operation, the project cannot drag and drop point clouds into the project.