Create a model
A model is a structure that links 2D/3D data processing workflows into a diagram, where the output of one tool serves as the input for the next. In ModelBuilder, you can create, edit, and manage models.
Steps
1.On the ModelBuilder tab, in the Model group, click New ![]() to open the New Model window.
to open the New Model window.
Create a model
2.Click OK to create the new model and activate the model editing view.
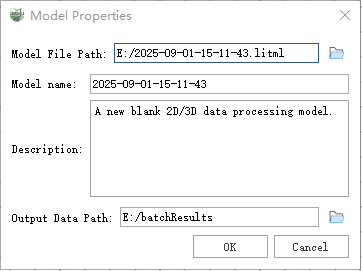
Parameter Description
Model File Path: The path where the newly created model file is automatically saved. By default, the model file is placed in the same directory as the project file and named after the project, with a .litml extension.
Note:
- If the current project is temporary, the default model file path is the same as the location of the first mounted point cloud in the project.
- To enable the model to run on distributed nodes, the project file must be created and saved on a shared network drive, and the data added to the project must also reside on the shared drive so that any node can access the data during execution.
Model Name: The name of the newly created model, which by default matches the project name.
Description: A description of the model’s functionality and characteristics to help others understand its intended use when sharing the model.
Output Data Path: The default storage location for tool outputs within the model (for newly generated data). By default, the output is stored in the folder where the project file is located.
Note: To enable the model to run on distributed nodes, this output path must be set to a shared network drive so that any node can access it during execution.