Using ModelBuilder
In LiDAR360MLS, you can use a variety of point cloud, vector, and raster tools from the toolbox to perform data production, processing, and analysis. The ModelBuilder is used to create, edit, and manage data processing models that automate the execution of these tools. A model is a workflow that chains multiple tools together, using the output of one tool as the input to another. ModelBuilder can also be thought of as a visual programming language for building tool workflows.
To build a data processing model in ModelBuilder, you need to add tools and data to the model and then connect these elements to establish the execution sequence.
Note: A mapping project must be opened before you can use ModelBuilder.
Open ModelBuilder
On the Tools tab, in the ModelBuilder group, click **ModelBuilder

Opening the ModelBuilder Menu
After clicking, the ModelBuilder tab will open.

ModelBuilder Tab
Next, click the New menu to open the ModelBuilder editing view.
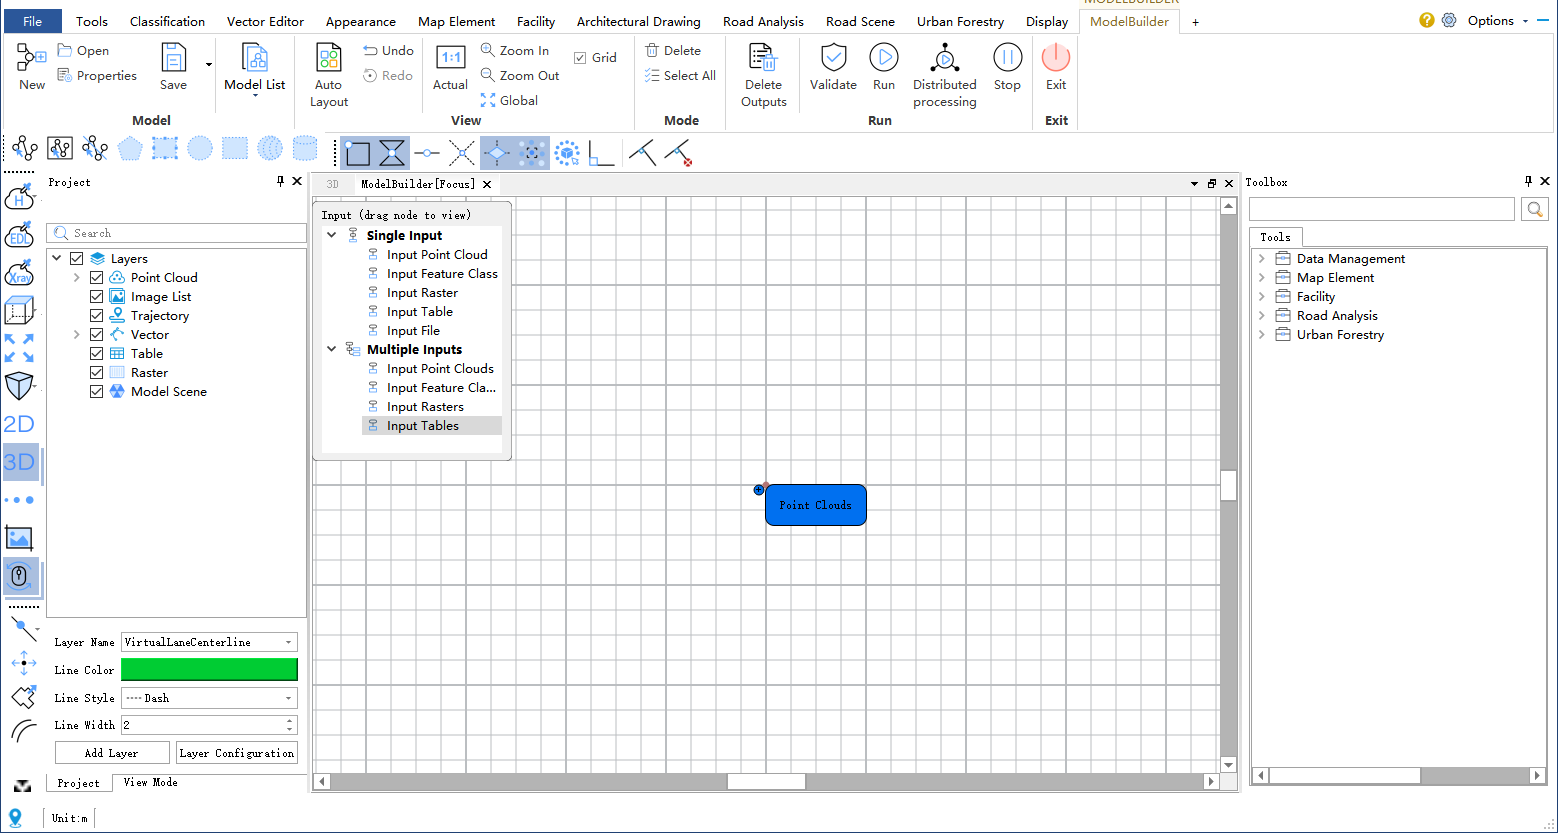
ModelBuilder Editing View
In this way, a new blank model is created and opened. You can add data variable elements, insert tools, connect data variable elements to tools, as well as delete and edit them in the editing view. Additionally, you can use a variety of operation tools on the ribbon to modify model properties, save, undo, redo, zoom in, zoom out, auto-arrange, run, and stop the model.
Learn more about opening a model
Adding Data
Models work with data, using the output of one data processing tool as the input for another. You can start building a model by first adding the data you want to process.
Adding Data Variables
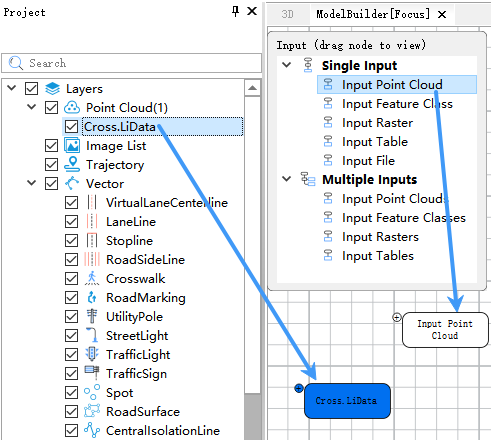
To add data to a model, first ensure that the model view is currently active. You can drag layers from the catalog tree or inputs from the floating input pane into the model. Once layers and inputs are dragged into the model, they are displayed as input data variables.
Learn more about adding data to a model
Adding Data Processing Tools
Data processing tools are the basic building blocks of your model. The LiDAR360MLS toolbox contains many tools that can be used to construct workflows within a model. Once you understand which tools are appropriate for the work you are performing, you can add them directly to the model.
Adding Tools
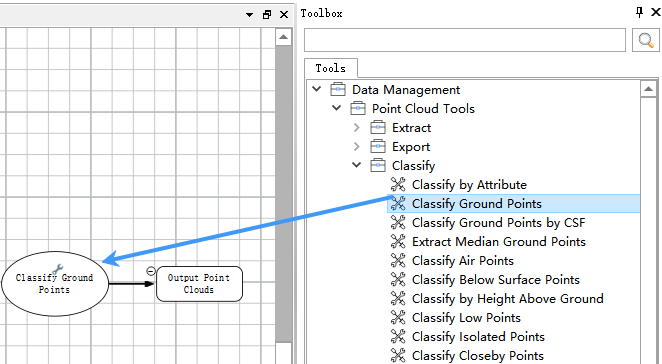
To add data processing tools to a model, ensure that the model view is active, and then drag the desired tools from the toolbox window into the model.
Tools added to the model typically appear in white, indicating that their parameters have not yet been validated. Additionally, for most tools added to the model, any output data variables created by the tool will also appear in the model diagram. See Flow and Status to understand the various states of tools and data variables.
Learn more about adding data processing tools to a model
Connecting Data and Tools
In the model view, you can connect data and tools within a workflow. You must specify which data processing tools will operate on which data variables in the model.
Connecting Data and Tools
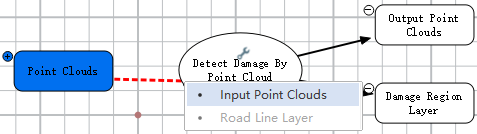
Connect the data variables you added to the model directly to tools by drawing a connection between them. Then select the tool parameter to which the variable should connect. While moving the mouse, the connection line appears as a red dashed line, and once the variable is successfully connected, the line turns into a black solid line. This creates a connection between the data variable and the tool. You can also connect the output of one tool as the input to another tool.
Learn more about connecting data and tools
Changing Tool Parameters
Just like running data processing tools from the toolbox, tools in ModelBuilder must have certain parameters set in order to run within a model.
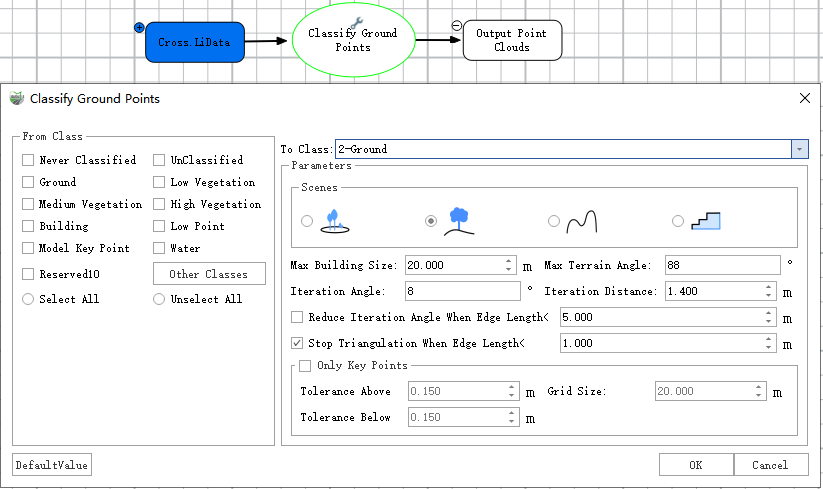
Ground Point Classification Tool Parameters Dialog
Double-click a data processing tool in the model to open it. After modifying the required tool parameters, click OK. Clicking OK does not run the tool; it only saves the tool parameter settings.
When all required parameters of a tool have valid values, the tool element changes to an orange color, indicating that the tool parameters have been validated and the tool is ready to run.
Learn more about changing tool parameters
Running a Model
To run the entire model, click the Run button on the ModelBuilder tab ![]() .
.
When tools in the model are executing, the corresponding tools in the model view display different status colors according to Flow and Status, indicating the current tool status: running, succeeded, or failed.