LiModel Editor
Functional Overview
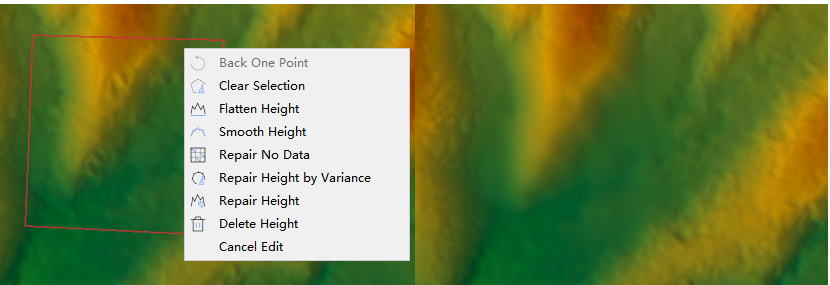
Provides editing operations forLiModel. The user can select area of interest using Polygon Selection, Lasso Selection, Screen Selection, or shp Selection, which can be edited by various operations such as Flatten Height, Smooth Height, Repair No Data, Repair Height by Variance, Repair Height and Delete Height.

Usage
Click Terrain > LiModel Editor, The current activation window will show the LiModel Editor toolbar.
Data Selection
Click Start Edit in the drop-down menu for editing. You can select one or more data which has been opened in LiDAR360 for editing.

Selection Tools
Provides multiple selection tools when performing elevation leveling, elevation smoothing, invalid value repair, spike removal, elevation patching, and elevation deletion.
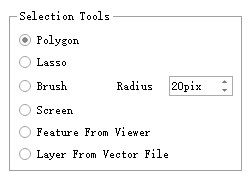
Polygon Selection
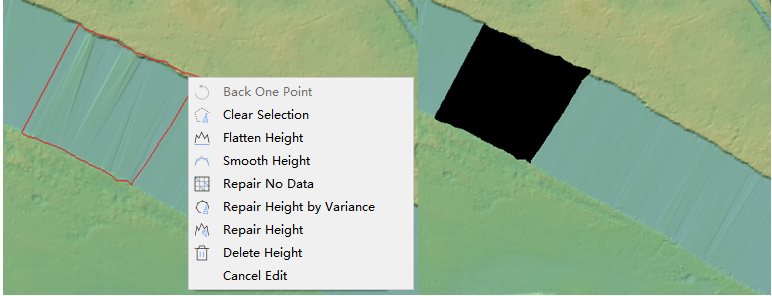
Click the left mouse button to add polygon vertices, and double-click the left mouse button to complete the selection. During the area selection process, you can right-click to undo the last point, enabling point-by-point backtracking. Polygon selection can only select areas within the data range.
Lasso Selection
Click the left mouse button to start area selection, move the mouse to add area vertices, and double-click the left mouse button to complete the selection. During the area selection process, you can right-click to undo the last point. Lasso area selection can only select areas within the data range.
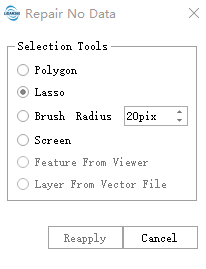
Brush Selection
Press and hold the left mouse button to start brush selection, and release the button to complete the selection. Brush selection can select areas beyond the data range.
- Radius: Brush selection radius, measured in screen pixels
Screen Selection
Click the left mouse button to add polygon vertices, and double-click the left mouse button to complete the selection. During the area selection process, you can right-click to undo the last point, enabling point-by-point backtracking. Screen selection can select areas beyond the data range.
Feature From Viewer
Select imported vectors in the scene by clicking the left mouse button for function execution. This option is only available when adding planar area breaklines.
Breakline of Flat Area (River、Lakes)
Draw closed areas interactively with the mouse, set parameters, and click the Add button to complete the addition.
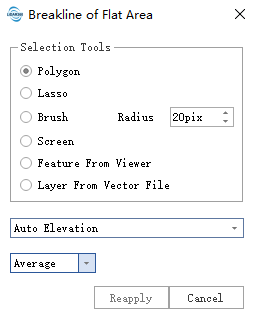
User Define: Projects the selected area to the same elevation plane. Users can manually input values or activate the selection button to pick points in the scene for elevation setting. Defaults to the elevation of the last drawn point.
Auto Elevation: Automatically calculates based on pixel elevations within the range.
Average: Takes the average pixel elevation within the selected range.
Maximum: Takes the maximum pixel elevation within the selected range.
Minimum: Takes the minimum pixel elevation within the selected range.
Percentile: Takes the percentile value of pixel elevations within the selected range.
Calculate Based on Selected Vector: Only valid when using scene vector selection. Calculates the average elevation of the selected vector as the parameter.
Linear Breaklines
Interactively draw a polyline through mouse interaction. After drawing, automatically calculates and adds breaklines based on parameters. Custom parameters can be set for recalculation.
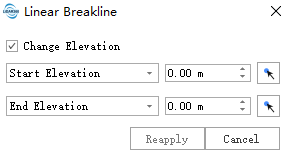
Change Elevation: Not checked by default. Determines whether to modify elevations along the line.
Start Elevation*: Defines the starting elevation value. Users can manually input or activate the selection button to pick points in the scene for elevation setting.
End Elevation*: Defines the ending elevation value. Users can manually input or activate the selection button to pick points in the scene for elevation setting.
Breakline of Gradual River
Interactively draw two bank lines through mouse interaction. After drawing, automatically calculates and adds river breaklines based on parameters. Custom parameters can be set for recalculation.
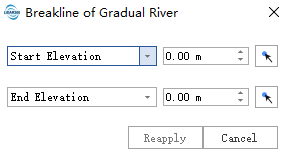
- Start Elevation: Defines the starting elevation value of the river. Defaults to the elevation of the starting point of the second bank line. Users can manually input or activate the selection button to pick points in the scene for elevation setting.
- End Elevation: Defines the ending elevation value of the river. Defaults to the elevation of the ending point of the second bank line. Users can manually input or activate the selection button to pick points in the scene for elevation setting.
Smooth Height
Click the Smooth Height button on the toolbar, select an appropriate selection tool for area selection, and execute elevation smoothing after selection based on set parameters. Uses image mean smoothing to process the model point-by-point within the selected area. Suitable for smoothing digital elevation models to generate smooth contour lines.

- Kernel Size (default: 5): Size of the mean filter kernel. Must be an odd number.
The effect is shown in the figure below, with the left image showing original data and the right image showing the edited result.
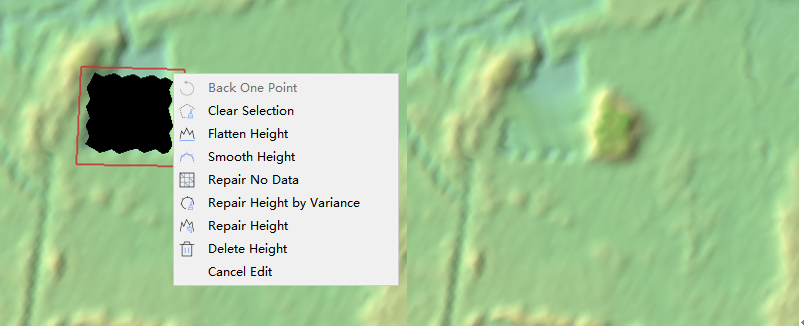
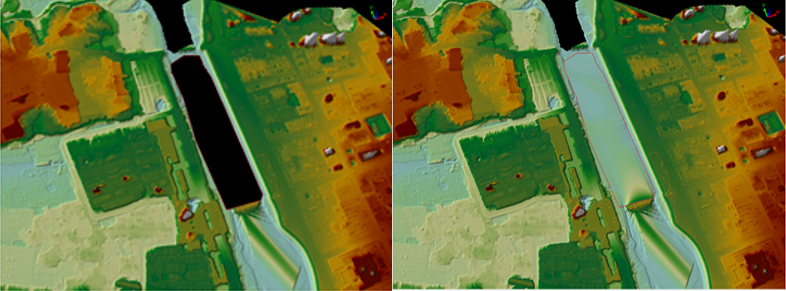
Repair No Data
Click the Repair No Data button on the toolbar, select an appropriate selection tool for area selection, and execute invalid value repair after selection. Uses bilinear interpolation to calculate elevation values for areas without elevation points.
The effect is shown in the figure below, with the left image showing original data and the right image showing the edited result.
Repair Height by Variance
Click the Repair Height by Variance button on the toolbar, select an appropriate selection tool for area selection, and execute spike removal after selection based on parameters. Used to repair spike noise caused by noise. Determines whether a point is noise based on elevation variance with neighboring points, and uses bilinear interpolation to calculate elevation values for noise points.
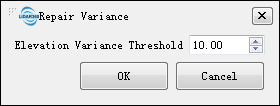
- Elevation Variance Threshold (default: 10): The elevation variance threshold used to determine if a point is noise.
The effect is shown in the figure below, with the left image showing original data and the right image showing the edited result.
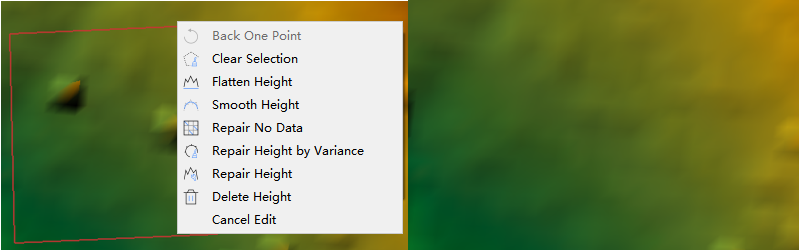
Repair Height
Click the Repair Height button on the toolbar, select an appropriate selection tool for area selection, and execute elevation repair after selection based on parameters. Used to repair elevations within a specified range. Uses bilinear interpolation to calculate elevation values based on parameter conditions.
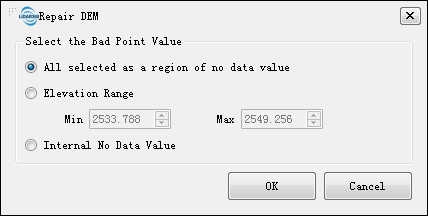
- Select the Bad Point Value: This parameter defines the range of grid points to be processed, potentially constraining the processing scope.
- All selected as a region of no data (default): All selected areas will be repaired.
- Elevation Range: Only repairs grid points with elevation values between the minimum and maximum values. Default min/max values are based on the elevation range of vertices in the selected area.
- Internal No Data Value: Only repairs no-data areas within the model.
The effect is shown in the figure below, with the left image showing original data and the right image showing the edited result.
Delete Height
Click the Delete Height button on the toolbar, select an appropriate selection tool for area selection, and delete elevation points within the selected range after selection.
Save DEM
Save editing results to LiModel file.
Cancel DEM
Cancel editing, discard editing results, and reload the original file for display.
Exit
Click the Exit button on the toolbar to exit LiModel editing. If editing results haven't been saved, click Exit or click End Editing in the edit button dropdown menu. Click Yes to save editing results and exit, click No to exit directly without saving, or click Cancel to return.