Classify by Custom Deep Learning
This function employs deep learning algorithms to classify point cloud or image data. It utilizes a supervised classification approach, where within the same batch of data, a small amount of data needs to be manually labeled to train a model, which is then used to process large volumes of data in bulk. Two workflows are supported: selecting training samples to generate a training model and then processing the data to be classified, or using an existing model to process the data to be classified.
To use this function, please ensure you have installed the Deep Learning Service.
Requirements
| GPU Requirements | Description |
|---|---|
| GPU Type | CUDA compute capability minimum 3.5, recommended 6.1 or higher. Learn more about Compute Capability |
| GPU Memory | Minimum: 6GB Recommended: 8GB or higher, depending on the deep learning model structure and batch size |
Usage
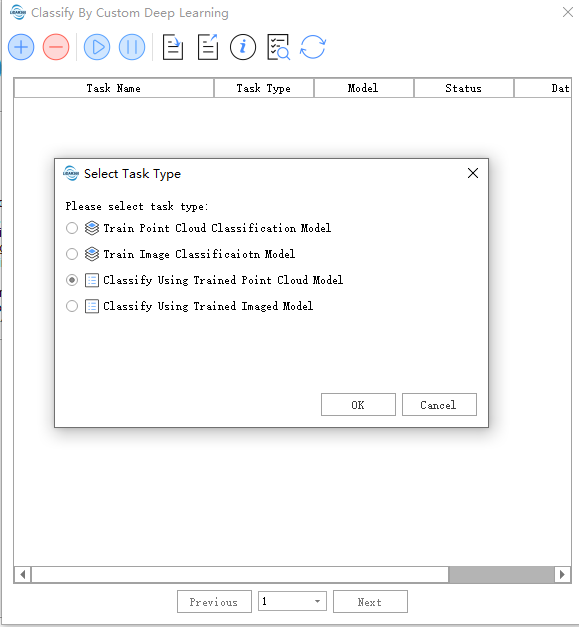
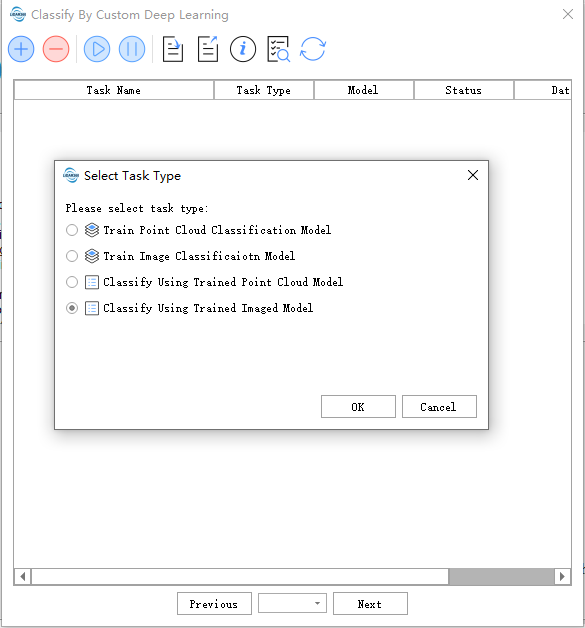
Click Classify > Classify by Custom Deep Learning Classification
Usage Procedure: Data preparation -->Training point cloud classification model -->Use training model for classification
The following is the task management page, which can display the status/management of training point cloud classification model tasks and use the training model to classify tasks.
Tool bar from left to right Create a task,delete a task, start a task, pause a task, export a task, task information,import task,model management,refresh
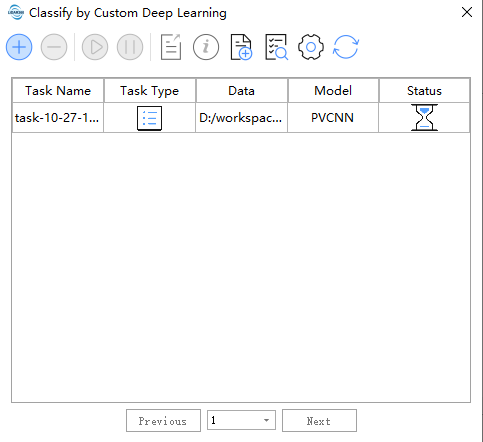
The task management page, it can display state/manage training point cloud classification model tasks.
Data Preparation
Point Cloud
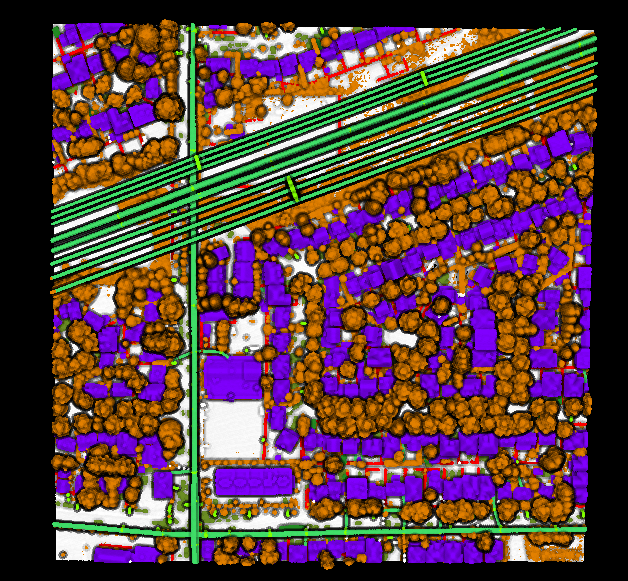
Before training, ensure that the labeled data required for training is prepared (as shown in the figure below). The profile editing function provided by LiDAR360 can be used to edit category data. The training data should be real-scene data and can be in LAS, LAZ, or LiData formats. Adjust the amount of training data based on the scenario and the algorithm’s processing method. In principle, the more labeled data used for training, the better. We recommend using data covering at least a 100m*100m area for an optimal experience. Please note that data labeling must follow a consistent principle, and category settings shouldn't vary with scenarios. Incorrectly labeled data may have adverse effects.
Image
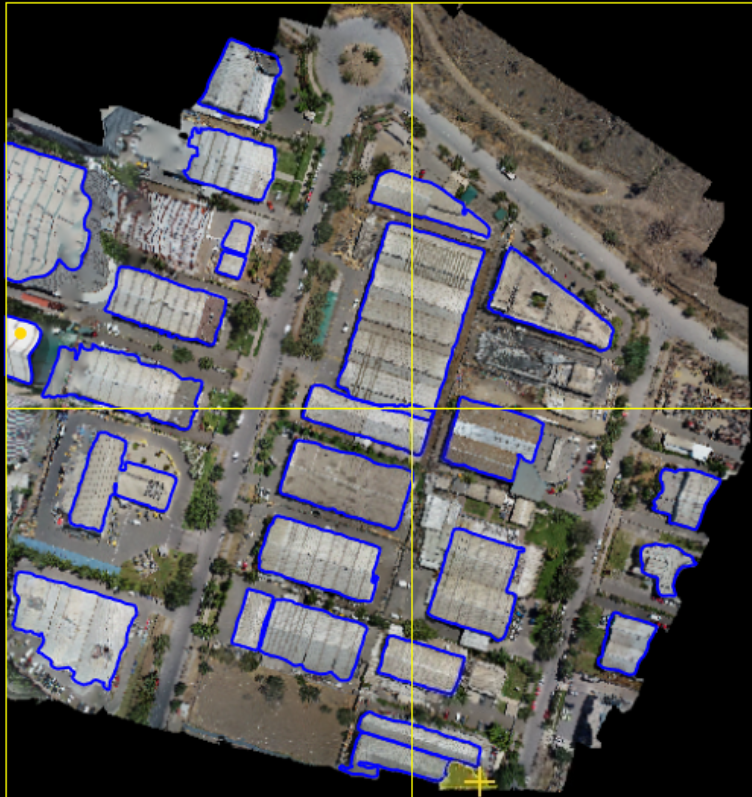
Before training, ensure that the labeled data required for training is prepared (as shown in the figure below). You can use the labelme annotation function provided by LiDAR360 or other labelme tools for annotation. The training data should be real-scene data and can be in common image formats such as JPG, PNG, or TIF. It is recommended that each image have dimensions smaller than 2048*2048, as larger images may lead to poor training performance. For large images, it is advised to tile them before annotation. The annotated data can be in the form of rectangular boxes or polygons, where rectangular boxes correspond to detection tasks and polygons correspond to segmentation tasks.
Training Model
Point Cloud
Click Classify > Classify by Custom Deep Learning-> Training point cloud classification model
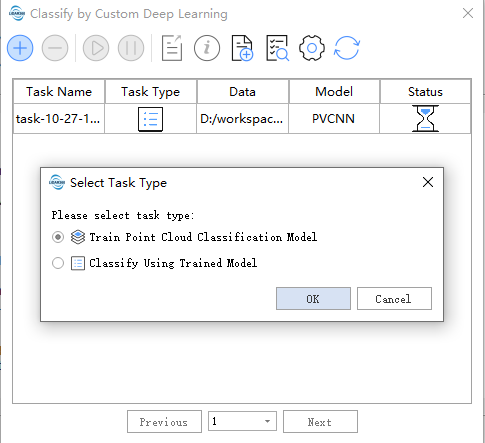
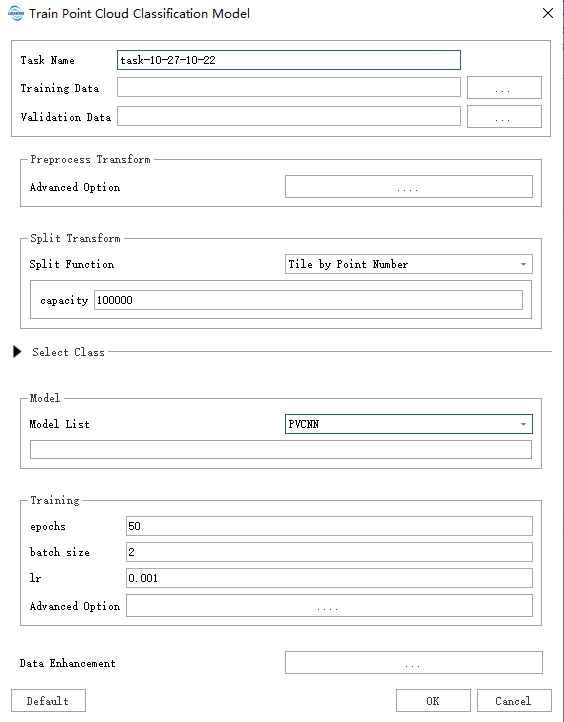
After filling in the data path as needed, click "Default" to use the default parameters and start the process.
- Task Name: The task name will be used as the name of the trained model.
- Training Data: Place the data with category labels in the same folder. All supported data formats in the folder will be read.
- Validation Data: Place the data with category labels in the same folder. The data in this folder will be used as a reference to calculate metrics such as accuracy.
Data Preprocessing:
- Advanced Option: Data preprocessing functions can be selected here, typically including statistical filtering, voxel filtering, etc. To avoid unexpected memory issues caused by overly dense data, voxel filtering is usually enabled by default.
Split Function:
- Split Function: Data splitting. To avoid excessive GPU memory usage, it is recommended to split the data into appropriately sized chunks. The choice of split size depends on data distribution, the algorithm, etc. Parameter Guide.
Select Class: Category mapping. Here, "Sample Class" refers to the categories in the training samples, while "Merge Tags" refers to merging the corresponding categories in "Sample Class" into a single category for training. Note that "Sample Class" should include all categories present in the training sample data. Categories labeled "0" in "Merge Tags" are considered background and are not included in training.
Model:
- Model List: The currently provided models include SPVANS, DRINet, PVCNN, KPConv, and MinkUNet (implemented with minor modifications from the original versions). For each of these algorithms, we provide recommended parameter settings. It is advised to use the "Default" button in the lower left corner to automatically fill in the subsequent parameters.
Training:
- epochs:
Epochs refer to the number of complete cycles through the entire dataset. One epoch is completed when all data has been processed once. - batch size: Batch size refers to the number of data samples processed in each iteration. Generally, a larger batch size is better if memory allows, as it offers advantages in both model accuracy and training speed. For GPUs with 8 GB of dedicated RAM, use the default batch size of 2. If you observe that a significant amount of GPU memory remains available during training, you can safely increase the batch size to process more chunks at once.
- lr: Learning rate (lr), used in conjunction with the optimizer to control the speed and direction of model learning.
- optimizer: Optimizer, as described above.
- lr scheduler: Learning rate scheduler, which adjusts the learning rate over epochs and can achieve better accuracy in certain scenarios.
- loss: Loss function. In the Advanced Options, CrossEntropyLoss is used by default. FocalLoss generally performs better in cases of class imbalance but may perform worse if labels are incorrect. CrossEntropy is recommended.
- epochs:
The bolded parameters above are mandatory, while others are optional. Please note that parameters may change with version updates.
Image
Click Classify > Classify by Custom Deep Learning-> Training image classification model
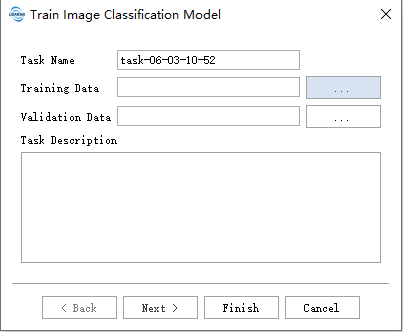
After filling in the data paths as required, click "Default" to use the default parameters and begin the process.
- Task Name: The task name will serve as the name of the trained model.
- Training Data: Place the data files with category labels and their corresponding annotation files in the same folder. All supported data formats and their associated annotation files in the folder will be read. The image and annotation file formats are shown in the figure below:

Validation Data: Place the data files with category labels and their corresponding annotation files in the same folder. The image and annotation file formats are consistent with those in Training Data. The data in this folder will be used as a reference to calculate metrics such as accuracy.
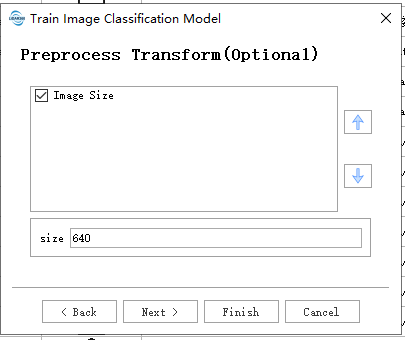
Data Preprocessing:
- Image Size: The size of the training images. During training, images will be resized to the specified dimensions.
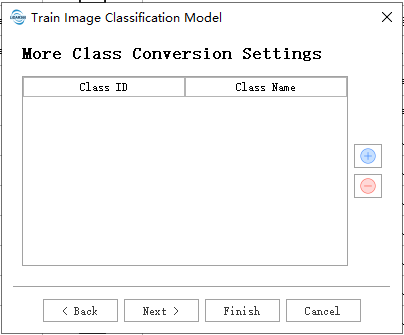
- Select Class: Category mapping, which associates the labeled numerical categories with the actual categories.
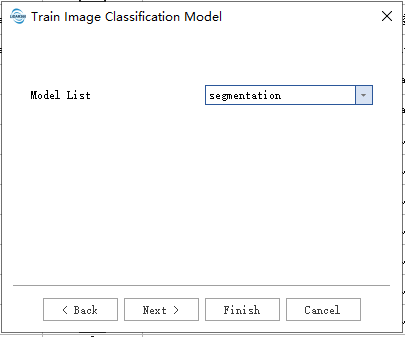
- Model:
- Model List: Currently, two models are provided: segmentation and detection. Segmentation is used for image segmentation tasks, while detection is used for object detection tasks in images.
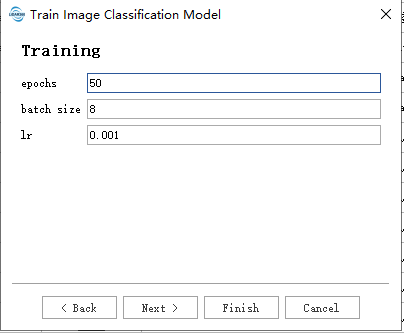
Training:
- epochs: Epochs refer to the number of complete cycles through the entire dataset. One epoch is completed when all data has been processed once.
- batch size: Batch size refers to the number of data samples processed in each iteration. Generally, a larger batch size is better if memory allows, as it offers advantages in both model accuracy and training speed. For GPUs with 8 GB of dedicated RAM, use the default batch size of 2. If you observe that a significant amount of GPU memory remains available during training, you can safely increase the batch size to process more samples at once.
- lr: Learning rate (lr), used in conjunction with the optimizer to control the speed and direction of model learning .
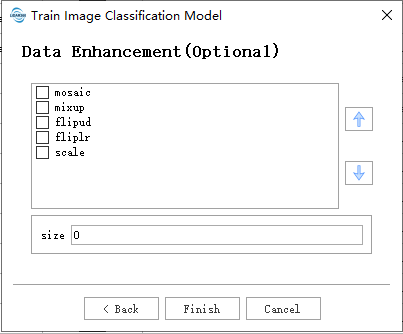
Data Augmentation:
- mosaic: Combines four training images into one, simulating different scene compositions and object interactions. Highly effective for understanding complex scenes.
- mixup: Blends two images and their labels to create synthetic images. Enhances model generalization by introducing label noise and visual variations.
- flipud: Flips images vertically with a specified probability, increasing data variability without affecting object features.
- fliplr: Flips images horizontally with a specified probability, useful for learning symmetric objects and increasing dataset diversity.
- scale: Scales images by a gain factor to simulate different distances between objects and the camera.
The bolded parameters above are mandatory, while others are optional. Please note that parameters may change with version updates.
Use training model
Point Cloud
Click Classify >Classify by Custom Deep Learning >Use training model for point cloud classification
- Data: Reads all supported data formats in the specified folder and directly modifies the source data. Please back up your data when necessary.
- Model: Select the model to be used. The model name will be identical to the training task name, and upon completion of training, it will be automatically added to the Model Manager.
- Evaluation Parameters:
- batch size: Primarily controls the amount of data processed by the model in each iteration. Appropriately increasing this value can accelerate processing but will also require more memory usage.
- weight name: Controls the selection of models based on specific optimal metrics (such as accuracy, mIoU, etc.)
Models will be generated when the training task completely stops (i.e., when the training task completes, is paused, or exits due to memory overflow).
The bolded parameters above are mandatory, while others are optional.
Please note that parameters may change with version updates.
Image
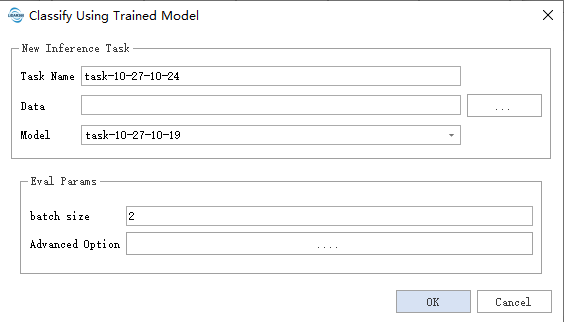
Click Classify >Classify by Custom Deep Learning >Use training model for image classification
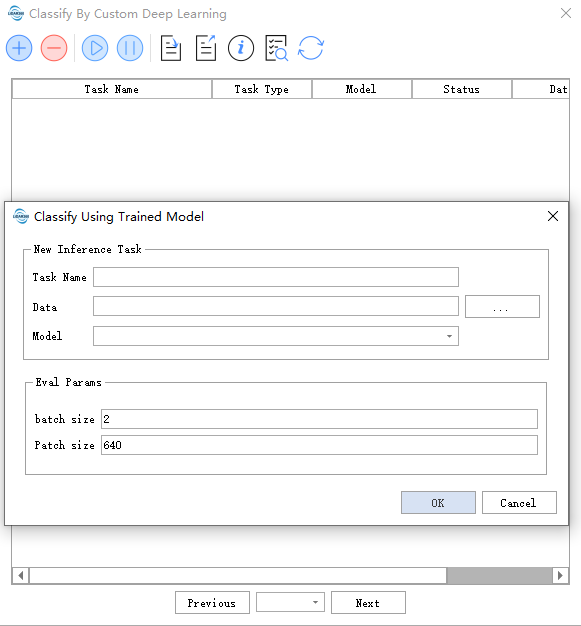
- Data: Reads all supported data formats in the specified folder.
- Model: Select the model to be used. The model name will be identical to the training task name, and upon completion of training, it will be automatically added to Model Management.
- Evaluation Parameters:
- batch size: Primarily controls the amount of data processed in each model iteration. Appropriately increasing this value can accelerate processing but will also require more memory usage.
- Patch size: The size of image patches when performing model inference.
Models will be generated when the training task completely stops (i.e., when the training task completes, is paused, or exits due to memory overflow).
The bolded parameters above are mandatory, while others are optional.
Please note that parameters may change with version updates.
Evaluating Training Results
Point Cloud Metrics:
Three metrics are provided: MIoU, Acc, and MAcc, primarily calculated based on the confusion matrix:
- True Positive (TP): Number of instances where the actual value is positive and the model correctly identifies it as positive
- False Negative (FN): Number of instances where the actual value is positive but the model incorrectly identifies it as negative
- False Positive (FP): Number of instances where the actual value is negative but the model incorrectly identifies it as positive
- True Negative (TN): Number of instances where the actual value is negative and the model correctly identifies it as negative
| Actual Class | |||
| 1 | 0 | ||
| Predicted Class | 1 Positive |
True Positive | False Positive |
| 0 Negative |
False Negative | True Negative | |
A table composed of these four metrics is called a confusion matrix.
IoU (Intersection over Union)
The ratio of the intersection area to the union area between the target and prediction.
MIoU (Mean Intersection over Union)
Acc (Accuracy)
MAcc (Mean Accuracy)
Typically, we only need to focus on the MIoU metric, i.e., the Mean Intersection over Union.
Image Metrics
The mAP metric is provided, which is calculated based on precision and recall.
Precision
Recall
Average Precision (AP): The area under the PR curve bounded by the horizontal and vertical axes. The PR curve is formed by Precision (accuracy rate) and Recall (completeness rate), with Recall on the horizontal axis and Precision on the vertical axis.
Mean Average Precision (mAP): The sum of average precision for all categories divided by the number of categories.
Training Process
To view the training process and results, right-click on the task and select "Task Details" to see detailed task information, training progress, training metrics, and training status.


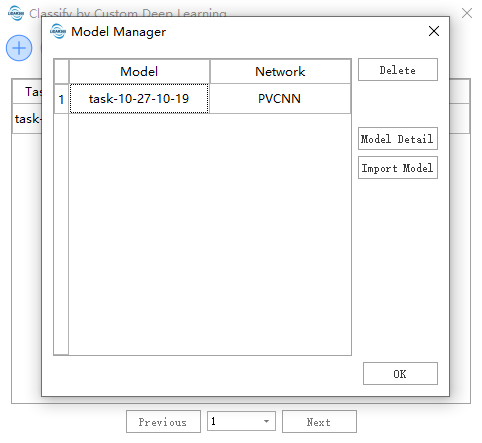
Model Management
The model management interface allows you to manage available models and import external models (only models produced by the LiDAR360 client).
Import Task
External models can be imported to obtain parameters/weights.
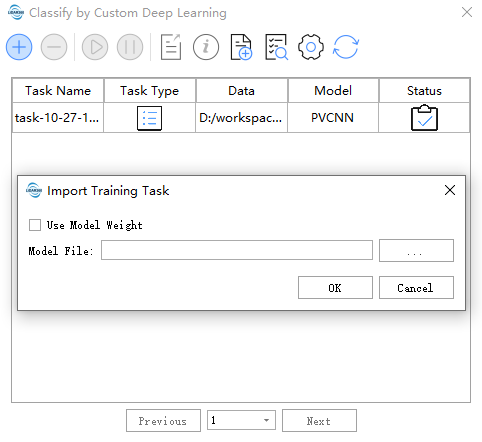
Model File: Path to the external model file (only supports models produced by the LiDAR360 client).
Use Model Weight: Model weights. When checked, it continues training; when unchecked, it only retrieves model training parameters.
Deep Learning Model Comparison
Point Cloud
The following data is from the training phase, using voxel downsampling with a voxel size of 0.5. Each data point contains approximately 200,000 points, with a batch size of 2. Time and space complexity are mainly affected by data density. The point density after multiple downsampling steps is difficult to control, so only approximate reference values can be provided.
Hardware Configuration:
- CPU: i7-10700k (8t16c)
- GPU: RTX3060
| Algorithm | Speed (items/s) | Memory Usage (GB) |
|---|---|---|
| PVCNN | 1.82 | 8G |
| KPConv | 0.04 | 11G |
| MinkUNet | 1.05 | 8G |
Generally, KPConv offers the highest accuracy and detail performance, recommended for small scenarios requiring fine classification. MinkUNet provides a larger field of view and suitable speed, recommended for large-scale scenarios. PVCNN offers good detail performance and the fastest speed, recommended for general use.
Image
The following data is from the training phase, with a batch size of 4.
| Algorithm | Speed (items/s) | Memory Usage (GB) |
|---|---|---|
| segmentation | 3 | 2G |
| detection | 3 | 2G |
Feature Selection
Point Cloud
Depending on the data characteristics, RGB and Intensity features can be added. RGB and Intensity features can help the model converge earlier, with little difference in final accuracy (depending on the actual data), and negligible differences in memory usage and computational speed.
| Features | mIoU |
|---|---|
| RGB+Intensity | 99.1 |
| Intensity | 98.8 |
| RGB | 99.0 |
| None | 98.7 |
Image
No feature selection required.
Data Splitting
Point Cloud
It is generally recommended to select at least the maximum size of the target classification category (e.g., if the largest building to be classified is 80m*80m, use a Tile by Range parameter length of 90 or above), and adjust based on hardware conditions. Tile by Range Point Number splits by point count, which may yield better performance in unevenly distributed data (e.g., sparse scenes).
Image
It is generally recommended to split the data into chunks during training, with a suggested chunk size not exceeding 2048.
Debugging Guide
- Insufficient Memory: Reduce the batch_size parameter. For point clouds, reduce the split transform size; for images, reduce the Image Size.
- Class Imbalance: Change the loss function to Focal Loss.
- Loss Fluctuation: During the early training stages, wait for a few more epochs. If it does not stabilize after 10-20 epochs, try reducing the learning rate (lr/10). It is recommended to use Cosine Annealing WarmRestarts for the lr_scheduler. If necessary, use a high learning rate initially and switch to a lower learning rate later by importing the model.
Notes:
- The validation set uses the same data augmentation as the training set by default.
- If the user does not specify input features, the model will use basic features as required.