## Software Installation and Activation ##
### Operation Environment ###
We recommend the use of a high-performance workstation, the configuration requirements are as follows:
- **RAM**: 16GB and above.
- **CPU**: Intel® Core ™ i5 / i7 is recommended; eight-core and sixteen-thread processors with single-core
processing performance of 4GHz and above.
- **Hard disk**: SSD is recommended with a transmission speed of 100M/s or above.
- **Display adapter**: NVIDIA discrete graphics cards such as the GTX 1070 and above are recommended, with at least 8GB of GPU memory.
- **Operating system**: Microsoft Windows 7 (64-bit), Microsoft Windows 8 (64-bit), Microsoft Windows 10 (64-bit), Microsoft Windows 11 (64-bit) or Windows Server 2012 and above.
> Note:
>
> - If the software is installed in the system disk, you need to run it in administrator mode.
> - Please use the high-performance graphics mode to run the software, the operation steps are as follows [High-Performance Graphics Mode](./Main/Appendix/Appendix_High-PerformanceGraphicsModeAdjustment.md).
> - The software requires 3D display support with OpenGL and GLSL versions no lower than 4.5, and a graphics adapter with at least 8GB of GPU memory.
### Installation ###
1.Launch LiDAR360MLS installation wizard.
2.Click next step when the installation dialog appears.
3.Click "I agree" to proceed if you agree with the license aggreement.
4.Choose installation path (or accept default path), and click "install".
5.Click "Finish".
### License ###
LiDAR360 MLS accepts two kinds of licenses: Hard lock and soft lock. Hard lock provides USB drive while soft lock
provides license key. As for hard lock, users should keep it safe and are not allowed to performe some operations
including format/delete/copy.
1)Hard lock license
Currently, LiDAR360 MLS can detect hard lock license at real time. Users need to plug in the USB drive into the port.
2)License key
The authorization code is generated based on the activation information provided by the LiDAR360 MLS user. After purchasing the authorization code, follow the steps below to activate LiDAR360 MLS.
1. Run LiDAR360 MLS, the license management dialog box will appear.
2. Fill in the name and company name, select the module that needs to be activated, and then click "Copy".
3. Paste the copied information into the body of the email and send it to .
4. The software authorization mode is divided into stand-alone authorization and group authorization. After receiving the authorization code, it can be activated and moved out online or offline.
- Single Use License
- Activation/Update
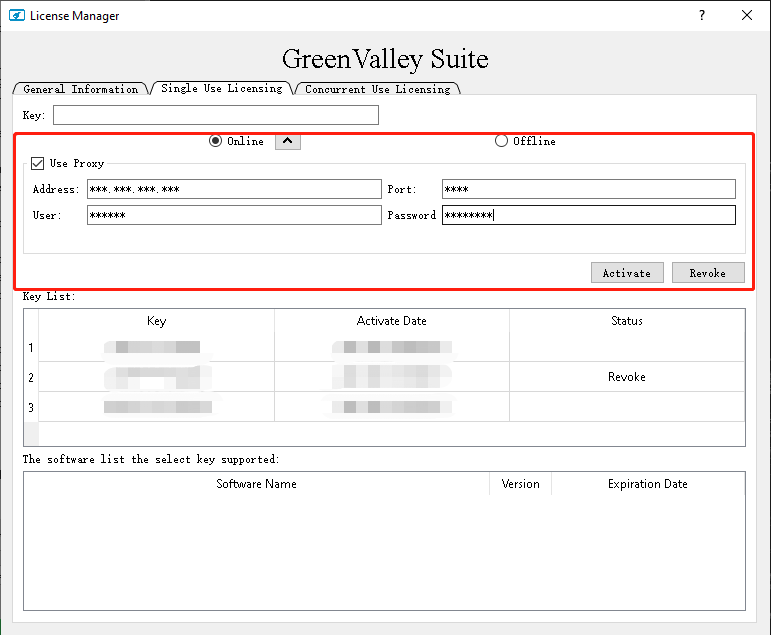
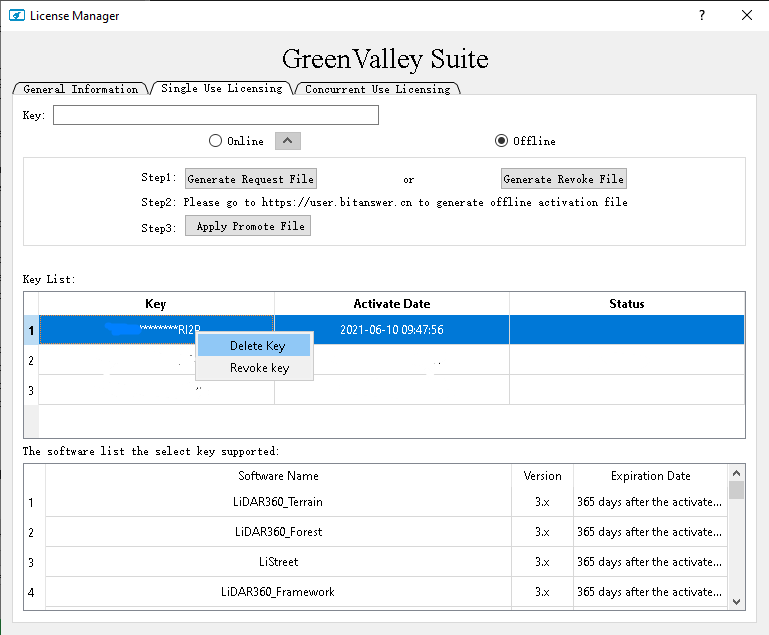
Online Activate/Update: When having networking, enter the key under Single Use License tab, select "Online", and click "Activate", Or select the authorization code in the Key list, right-click, and select "Activate Key" from the pop-up menu. Users can check valid date in basic information module. If you need to use proxity, click  , and set address, port, user name and password of the proxy in the corresponding blanks.
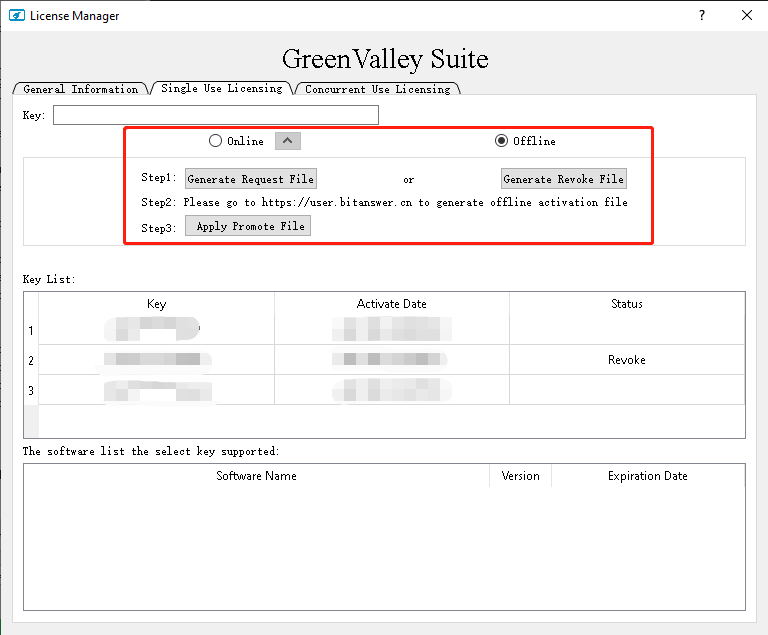
Offline Activatin/Update: Enter the key under Single Use License tab, select "Offline", and click"Generate request file"(.req). Use a computern with internet access, type in an internet browser, enter the license key to log in and click "Offline update". Upload .req file, and then a file named as "download.upd" will be generated. Download the "download.upd" file and click "Apply license file" in License manager page to activate/update the license.
- Revoke
When the user needs to unbind the authorization code and the machine, the authorization code can be moved out online or offline. After the authorization code is moved out, it can be used on this machine and other machines by reactivating it, and the authorization code can be re-entered to activate.
Online migration: In the "Single-machine authorization" tab, enter the authorization code, select "Online", click "Move out", or select the authorization code in the Key list, click the right mouse button, and select "Move out key" in the pop-up menu . Click to use the proxy to set the address, port, user name and password.
Revoke offline: Enter the authorization code, select "Offline", click "Generate Move Out File" to generate move out request file (.req). With the help of a computer that can be connected to the Internet, enter http://user-us-west.bitanswer-cloud.com in the browser, enter the authorization code to log in, click Offline Upgrade, upload the request file (.req), and download the generated upgrade file (.upd). On the license management interface, click "Apply License File".
- Delete
When the user needs to delete the authorization information from the machine, click the right mouse button on the authorization code and select delete key. After the authorization code is deleted, it can be activated again for use on this machine, but cannot be used on other machines.
- Group authorization
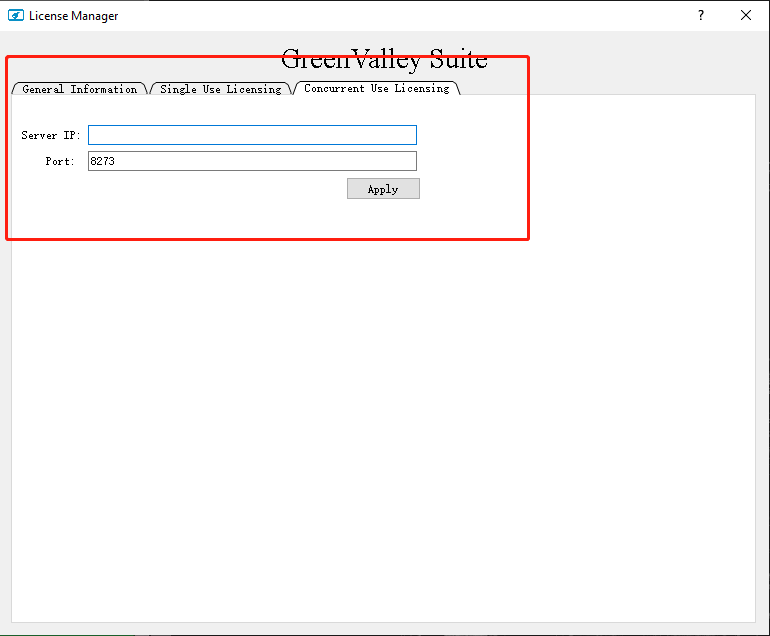
Install the group authorization service tool on the group server in the local area network and add the group service extension module. In the group authorization management center, activate the authorization code online or offline. Other users in the local area network enter the server's IP address and port on the license activation interface The default is 8273, no need to modify, click "Apply".
6.Click the help button  in the upper right corner of the license management interface to view the license management Help manual.
> Note:
>
> 1.If the software is already open when the authorization code is updated, please restart the software after the update.
>
> 2.If the authorization code has already been used on one of the machines, and now you want to use it on the other machine, you should first move the authorization code out on the first machine. If the activation code has been deleted, you should activate it on this machine first, and then move out.
>
> 3.Please contact to inquire and purchase a license key to activate LiDAR360MLS.
### Changing Programme Language ###
The software currently provides four languages: English, Chinese, Traditional Chinese, Japanese. Users can switch according to their needs. The switching steps are as follows:
1.Click **Options > Language > English, Chinese, Traditional Chinese, Japanese**.
2.Click "Yes" to restart the software and complete the software language switch. After selecting "Cancel", the software will not restart, it will be displayed in the set language the next time the software is started.
### Installation of Deep Learning Extension Modules ###
#### Configuration Requirements
- **CPU**: Recommended Intel® Core™ i5/i7; eight-core sixteen-thread processor, single-core processing performance of 4GHz and above.
- **RAM**: 16GB and above.
- **Display Adapter**: Recommended independent NVIDIA graphics card, with no less than 8GB of video memory, and computing power greater than or equal to 5.0. The computing power of the graphics card can be queried [on the official NVIDIA website](https://developer.nvidia.com/cuda-gpus).
#### System Requirements
Microsoft Windows 7 (64-bit), Microsoft Windows 8 (64-bit), and Microsoft Windows 10 (64-bit).
#### System Configuration
Before running the deep learning model, it is recommended to check your computer system and install the latest drivers for your graphics card.
#### Install Graphics Card Driver
The minimum required driver version is **465.89**. It is recommended to install the latest graphics card driver as much as possible, which can be downloaded on the [NVIDIA Driver Download](https://www.nvidia.com/Download/index.aspx) page.
#### Check Graphics Card
The process of using deep learning will occupy a lot of memory of your computer's graphics card. To perform the deep learning process, it is recommended to use an NVIDIA GPU with at least 8 GB of dedicated memory and a minimum support of CUDA 11.3. To check the availability of the graphics card, you can use the NVIDIA SMI program and the NVIDIA Control Panel. The specific check 6/20/2023 3:47:41 PM teps are as follows:
Method one:
(1)Use the **win+r** combination key to open the Windows runtime interface, and enter **cmd** to open the command prompt window.
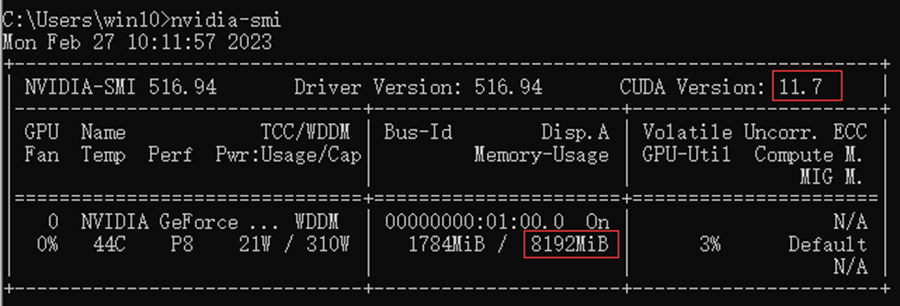
(2)Enter the **nvidia-smi** command in the command prompt window and press Enter. The maximum dedicated GPU memory and the highest supported CUDA version of your computer are displayed (if not displayed, please refer to **Install Graphics Card Driver** tutorial Install Graphics Card Driver). The information displayed may vary depending on your computer. In this example, there are 8192MB (8 GB) of dedicated memory in the GPU, and the highest supported CUDA version is 12.0.
> Note: If there are multiple graphics cards, record the name of the best graphics card, and select the best graphics card for calculation in the deep learning module. Currently, only single graphics card calculations are supported.
Method two:
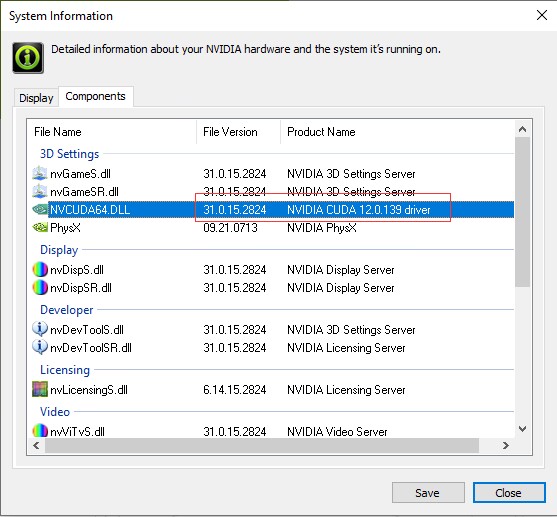
(1)Right-click on the desktop to open the **NVIDIA Control Panel**. Select **Help**->**System Information**->**Components**, and check the highest CUDA version supported by the current graphics card driver. As shown in the example in the figure, the highest supported CUDA version is 12.0.
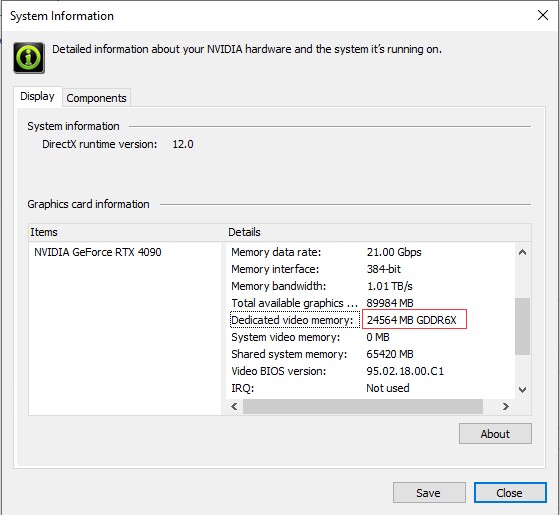
(2)Select "Help->System Information->Display" to check the maximum dedicated GPU memory of the current graphics card. As shown in the example in the figure, the dedicated memory is 24564MB (24G).
#### Expanded Module Installation
To use custom deep learning features, you need to install the deep learning extension module on top of the LiDAR360MLS installation.
1)Firstly, visit [the website](https://licloud.greenvalleyintl.com/api/v1/softwares/169/package) to download the latest version of the extension package.(For example LiDAR360MLS_AILIB8.0.0.0_20240606.exe)
2)Then, Double-click to run the installer.
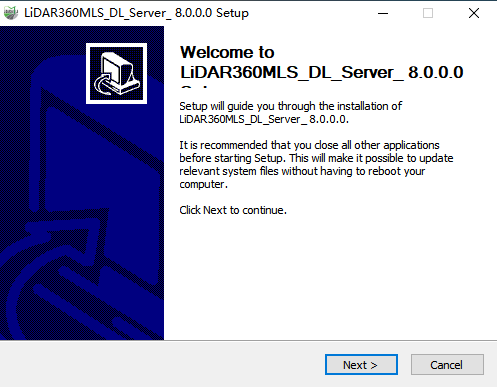
Click **Next** and read the license agreement. If you agree, click **Next**.
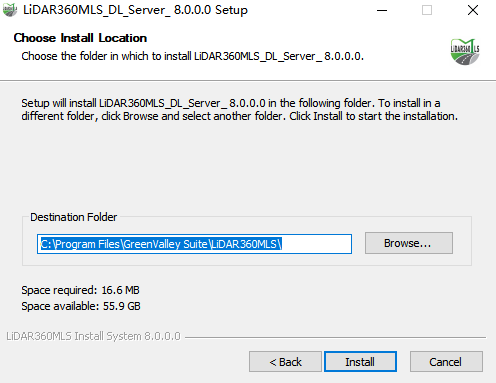
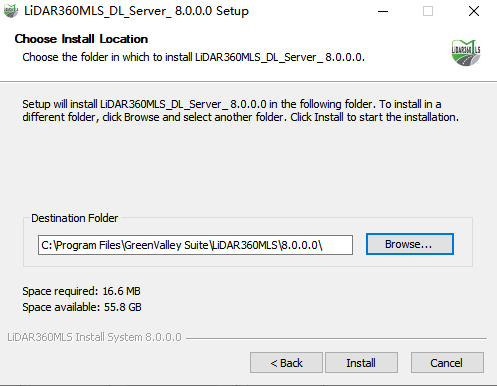
If the installation path shown in the image below is correct and ends with the version number, click **Install** to proceed. If the path is incorrect, manually select the path that ends with the version number.
3)Finally, click on any deep learning-related feature. If it functions properly, the installation is successful.
in the upper right corner of the license management interface to view the license management Help manual.
> Note:
>
> 1.If the software is already open when the authorization code is updated, please restart the software after the update.
>
> 2.If the authorization code has already been used on one of the machines, and now you want to use it on the other machine, you should first move the authorization code out on the first machine. If the activation code has been deleted, you should activate it on this machine first, and then move out.
>
> 3.Please contact to inquire and purchase a license key to activate LiDAR360MLS.
### Changing Programme Language ###
The software currently provides four languages: English, Chinese, Traditional Chinese, Japanese. Users can switch according to their needs. The switching steps are as follows:
1.Click **Options > Language > English, Chinese, Traditional Chinese, Japanese**.
2.Click "Yes" to restart the software and complete the software language switch. After selecting "Cancel", the software will not restart, it will be displayed in the set language the next time the software is started.
### Installation of Deep Learning Extension Modules ###
#### Configuration Requirements
- **CPU**: Recommended Intel® Core™ i5/i7; eight-core sixteen-thread processor, single-core processing performance of 4GHz and above.
- **RAM**: 16GB and above.
- **Display Adapter**: Recommended independent NVIDIA graphics card, with no less than 8GB of video memory, and computing power greater than or equal to 5.0. The computing power of the graphics card can be queried [on the official NVIDIA website](https://developer.nvidia.com/cuda-gpus).
#### System Requirements
Microsoft Windows 7 (64-bit), Microsoft Windows 8 (64-bit), and Microsoft Windows 10 (64-bit).
#### System Configuration
Before running the deep learning model, it is recommended to check your computer system and install the latest drivers for your graphics card.
#### Install Graphics Card Driver
The minimum required driver version is **465.89**. It is recommended to install the latest graphics card driver as much as possible, which can be downloaded on the [NVIDIA Driver Download](https://www.nvidia.com/Download/index.aspx) page.
#### Check Graphics Card
The process of using deep learning will occupy a lot of memory of your computer's graphics card. To perform the deep learning process, it is recommended to use an NVIDIA GPU with at least 8 GB of dedicated memory and a minimum support of CUDA 11.3. To check the availability of the graphics card, you can use the NVIDIA SMI program and the NVIDIA Control Panel. The specific check 6/20/2023 3:47:41 PM teps are as follows:
Method one:
(1)Use the **win+r** combination key to open the Windows runtime interface, and enter **cmd** to open the command prompt window.
(2)Enter the **nvidia-smi** command in the command prompt window and press Enter. The maximum dedicated GPU memory and the highest supported CUDA version of your computer are displayed (if not displayed, please refer to **Install Graphics Card Driver** tutorial Install Graphics Card Driver). The information displayed may vary depending on your computer. In this example, there are 8192MB (8 GB) of dedicated memory in the GPU, and the highest supported CUDA version is 12.0.
> Note: If there are multiple graphics cards, record the name of the best graphics card, and select the best graphics card for calculation in the deep learning module. Currently, only single graphics card calculations are supported.
Method two:
(1)Right-click on the desktop to open the **NVIDIA Control Panel**. Select **Help**->**System Information**->**Components**, and check the highest CUDA version supported by the current graphics card driver. As shown in the example in the figure, the highest supported CUDA version is 12.0.
(2)Select "Help->System Information->Display" to check the maximum dedicated GPU memory of the current graphics card. As shown in the example in the figure, the dedicated memory is 24564MB (24G).
#### Expanded Module Installation
To use custom deep learning features, you need to install the deep learning extension module on top of the LiDAR360MLS installation.
1)Firstly, visit [the website](https://licloud.greenvalleyintl.com/api/v1/softwares/169/package) to download the latest version of the extension package.(For example LiDAR360MLS_AILIB8.0.0.0_20240606.exe)
2)Then, Double-click to run the installer.
Click **Next** and read the license agreement. If you agree, click **Next**.
If the installation path shown in the image below is correct and ends with the version number, click **Install** to proceed. If the path is incorrect, manually select the path that ends with the version number.
3)Finally, click on any deep learning-related feature. If it functions properly, the installation is successful.